Sunday, 26 April 2020

Another brake van and another railcar

Back on the island the last couple of weeks have seen a few new arrivals. Firstly, a Bachmann Rheneas arrived, a nice sweet runner but a bit on the orange side and with a stupid face. The plan is to convert it to either a proper model of Dolgoch or  some sort of Isle of Stoner version, possibly cabless. Either way I need an NP Dolcoghification kit which is currently out of stock so the decision can be postponed. I've put it back in its box for now but I might start work taking it to bits and stripping the paint off it in preparation. 

Nice, but too orange.

I've mentioned before how much I like brake vans and after building the little 3D printed one a while ago I saw its big brother for sale via evilbay. I ordered it and then forgot about it. They take quite a while to arrive in normal circumstances; which these are not.

The kit makes it possible to build with the doors open so I decided that one open door was a good idea.

While looking for the whitemetal brake pipes etc I found a casting of a stove from a signal box interior (Wills?) kit. It seemed like a good excuse to add it to the van's inside.

I made a bit of a bodge putting it together but it's come out OK in the end and has entered service. Known by IoSR guards as 'the winter van' on account of how cosy the stove keeps it. 

Here it is, waiting for a run down the line.

Another random purchase was one of the newly re engineered KATO 11 109 chassis which replaced the venerable 11 103s. It finally arrived and I wondered what to do with it. On test it ran very smoothly and slowly in exactly the way the old ones didn't. I was never a big fan of them but I do have a couple of things which have them as motive power which will now need to be swapped out and become useful vehicles. Anyway, I didn't want to just do a swap for an old one so I had a rummage on Shapeways and found a rather nicely proportioned Tom Bell designed, two ended railcar.

The print as it arrived just with the new chassis clipped in place

Never one to build things as intended I set about mucking about with the body. It has a rather textural surface as I opted for the cheaper (although still rather too pricey) white plastic version. It has the advantage of being less fragile and easier to cut and drill but the disadvantage of a surface texture you can't easily flatten. I added some styrene H beams underneath and few other styrene parts to make the proportions more pleasing to my eye.

I wanted to fit an interior which I constructed to be able to be poked through the hole on the floor that the chassis fits in but I wasn't looking forward to finishing the inside through this aperture.

I thought about cutting the roof off but couldn't see how I could do it neatly enough to put it back on with it looking awful. Then it occurred that I could leave the edge of the roof intact and then put a thin covering on once the interior was finished. So out with the dremel and off with the roof. Then a suggestion was made in jest that it could be a convertible. I loved that idea and so tidied up the edges of the hole and got on with painting and building the insides.

The inside on the outside

With a sleepless night or two and continuing lockdown I finished the painting and detailing. The canvas roof is a piece of bog roll cut to shape and wound round a length of brass rod, stiffened with superglue and then painted. It's a similar idea to how I've made canvas cab backs for a couple of open cabbed steam locos.  I found the Dennis nameplates from the recent Narrow Planet Beyer Peacock build and it occured to me that it was an appropriate name for a railbus.


I'm rather pleased with the result and it has joined the fleet of steam and ic powered railcars and tram type things.

A gathering of all of the passenger trams and railcars. In the platform road  (L to R) are the small steam tram, 'Lady Susan' the big steam tram, 'Dennis', 'Herman' and 'Brigitte' and her O&K coach. In the loop line are 'Queenie' and 'Nursie'. 'Nursie is one of my oldest surviving vehicles and runs on a Bachmann 0-6-0 diesel.

Saturday, 11 April 2020

Sinc Bach - an off island side project

With all this spare time being forced on me, I decided that it would be a good idea to try to finish some projects that have been long stalled. This is quite an extensive list but who knows how long this may last. I have a slate quarry in a camera case part built - Sinc Bach which I've started on first. Then there is the part built standard gauge n gauge preserved branch line - next in line as I have most of the bits I need now to finish it, at the moment it is just a baseboard and collection of parts. Third on the list is the 006.5 layout which is really only a small collection of rolling stock and track and an idea, this one will be fun.

However, back to the quarry. The back story is that the layout represents a small corner of a larger quarry somewhere n North Wales. As I live within walking distance of Dinorwic it has to be said that this is a large influence.

This is the whole thing as I left it shut away for probably ten years.

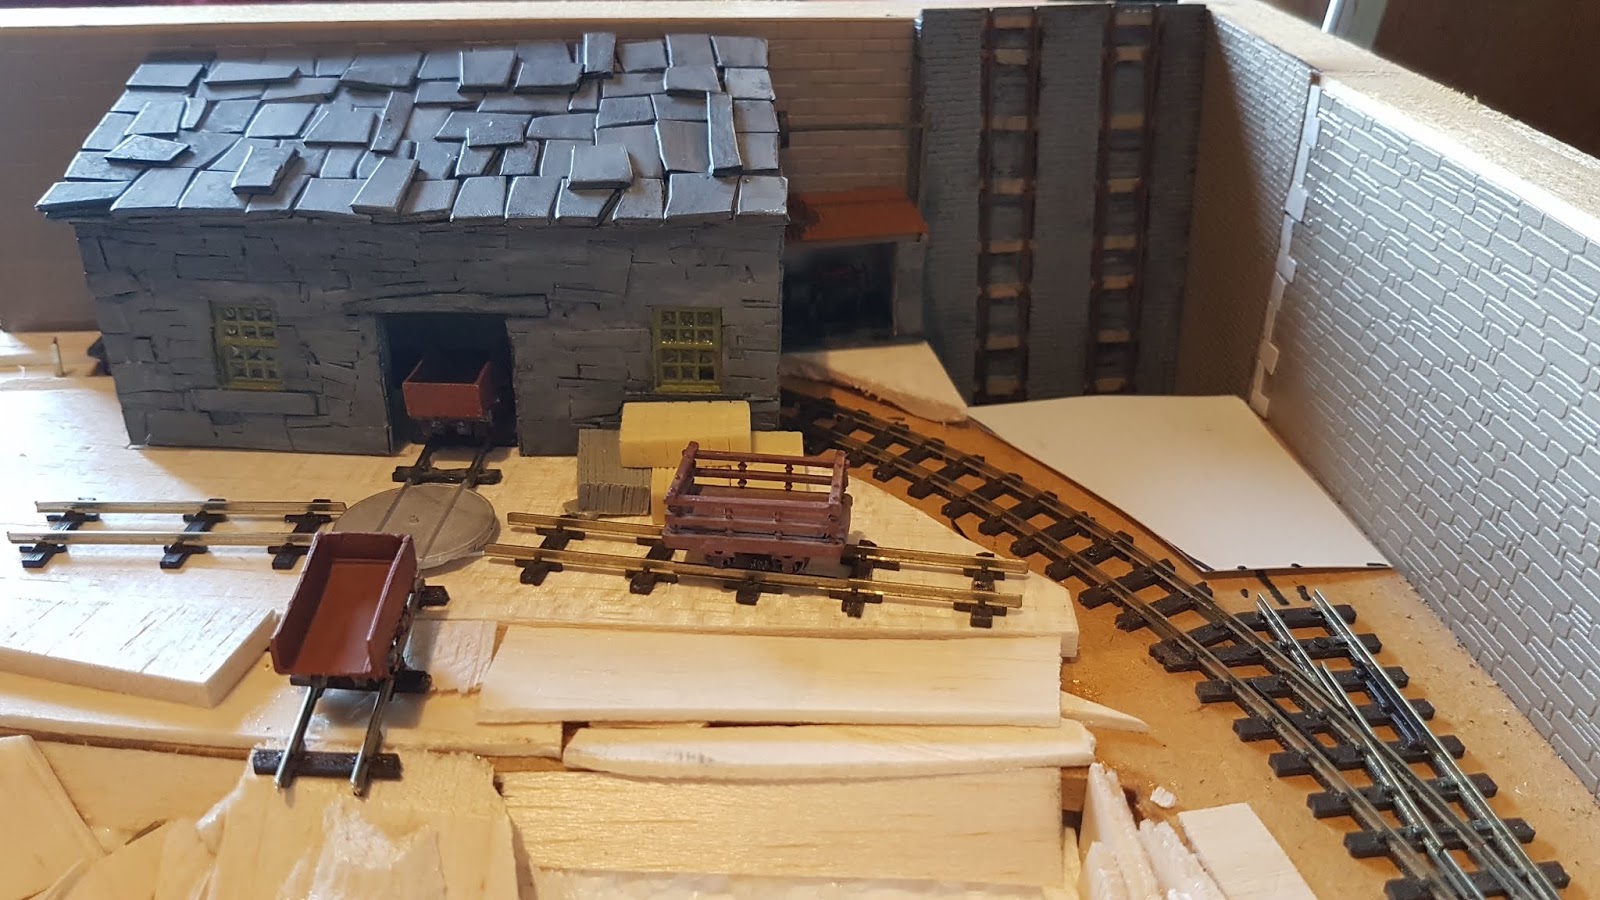
I had constructed a plasticard carcass of the dressing shed building and then run out of steam, I couldn't think how to make it look like it was made of  sawn slate waste blocks as the real things are. the conclusion I came to was that there was no quick way to do it so I set about stone cladding it with small cut up pieces of styrene sheet. It was very time consuming and it occurred to me to give up more than once but in the end I found it quite therapeutic and the result was very pleasing.

Quite a lot of quarry buildings had roofs made from layers of slate slab rather than tiles, this was for two reasons. Firstly, you don't want to waste finished tiles that you could sell. Secondly, tiled roofs are relatively fragile and so where there regular blasting operations which sometimes hurl large blocks of slate about the place a nice solid (at least a foot thick) slate roof is a good protection. Again I chopped up some styrene sheet to represent this.

Here it is after a squirt of grey primer, this confirmed to me that my technique was successful enough.

The other building that was needed was a weighbridge hut, the little brick built hut that came free on the front of the Railway Modeller was the perfect size so I built it and then stone clad it in a similar way to the big shed.

I had intended to put the weighbridge here on the exit tramway but it obscured too much of the dressing shed.

Some detail painting done and a lean too added with the diesel motor to turn the line shafting for the saw and other machines in the dressing shed.

My Brian Madge quarry Hunslet with the new position of the weighbridge. I'd repainted the loco some time ago with the intention of making it look in quarry condition, i.e. filthy but I hadn't plucked up the courage to filth it up. Now I have and it looks perfect, well as perfect as I can get it.

Plan A was to have the slate arrive from an adit in this corner, rather in the style of the Blaenau quarries but as a Dinorwic man through and through I decided that an incline was the way to go, it would have to be only the very bottom of a very steep table type. This meant I had to cut a hole in the baseboard for the table to drop into... this meant taking the whole layout to pieces but will be worth it in the end.

This is the incline in place.

The next job was to paint the incline and then add some basic slatey style scenery with balsa wood and styrene. Unfortunately I've now run out of  Mekpac so all styrene work has come to a halt. The next major thing being to construct the incline truck and the plate rail trackwork leading to it. I'll do this with styrene strip as most rail in areas like this in the quarry was only suitable for hand pushed wagons and made of flat steel plate, often using sleepers with cuts in them rather than chairs.

This is the current state of play, the next major job is to start to cover the whole ground and sinc walls with filler. Then a squirt of grey and some more acrylic to pick out some detail. Once all that lot is done I'll be able to add small bits of real slate especially in the tipped areas. The bottom of the sinc will be flooded with the coppery turquoise water that builds up in such places.

Wash your hands and stay safe.

Saturday, 28 March 2020

...and to buy one would be greedy...

I seem to have bought a new Minitrains steam tram loco by sort of mistake. I emailed Andrew Hastie to ask if he had any in stock yet and the next thing I know, one was on his way. I could easily have stopped it but I'd always wanted an Egger tram and this is a much nice thing; apart from anything else it runs beautifully.

Fresh out of the box

I'm not one to leave anything alone, so I straight away set about a few little modifications, nothing major as I didn't want to bugger it up. First thing I did was to order some Henschel works plates and name plates from Narrow Planet. It will be named 'Brigitte', Anyone's guess when the plates will get made as NPs etcher is in hiding - fair do's.


In a lot of ways the most obvious part of this loco is the roof so I decided that I'd change the plastic whistle for a nice brass one. In the process I scratched the roof and had to polish it out; I had wondered about a spot of paint on the roof but this confirmed it. Gunmetal from Tamiya is my chosen loco roof colour and I think it just gives it a bit of something. 

With the Jelly Models O&K coach


Looking in my loco bits box I saw a bell from a Minitrains F&C and it looked just right for a tram, on the roof would have been too tall so in the front window seemed a good idea. I've also given the loco some crew which along with the bell help to conceal the inevitable Minitrains flywheel. Using a couple of metallic sharpies I picked out the chimney cap in copper and the lamps in brass. There are some pipes running down the sides of the boiler so a similar idea with Tamiya tinbitz just brings them out of the dark slightly.

Nice loco


I've decided that with the enforced home isolation, I should get done as many of the little jobs that are on the never ending list as I can make myself do. So I started by re attaching the couplings to a TeeBee flat wagon that I dropped onto a hard floor. I also wanted to use the 009 society FR open coach with the tram but it had always had couplings at slightly the wrong height and no passengers. Both things now sorted it makes a good holiday train with another of Tom's prints, a slat seated open coach, this always looked nice but was slightly too tall so I cut a section out of the roof support and reattached it. Much  better. While I was looking for people I noticed that I had a large collection of Preiser luggage so I loaded up the flat wagon to go with the holiday makers.

Also stuck a cat on the roof... we have an old black cat who used to like to sneak into any car she could and get a sneaky ride so I figure that she might also like to ride on trains.


Loads of other half finished and unstarted projects to attend to so who knows what I'll do next... apart from wash my hands. Stay safe.

Thursday, 19 March 2020

To build an engine would be an awfully big adventure

The world seems to have gone bonkers, mostly it seems to be shut. However on the Isle of Stoner in 1964 everything is just fine. It seems that the Ffestiniog Railway has sold off some of its small Birminghams or bug boxes as they are fondly (?) known. Lord Stoner being a bit of a hoarder of second hand rolling stock, three have turned up and entered service.

Obviously they are actually the new PECO FR coaches and they are lovely. Theses ones are in the first preservation livery of green and white. They look at home with the IoSR's double Fairlie and a small raje of PECO FR slate wagons.

The van is a Dundas kit but will eventually be replicated in the PECO RTR range.


Here they are. Delightful

Last year, at the Warley show I bought a Narrow Planet Beyer Peacock kit which I'd had my eye on for some time. Predictably I didn't want to build it exactly as intended as I didn't want a GWR looking loco. I decided to ditch the supplied boiler fittings which although very nicely cast in whitemetal, just screamed Great Western.

The kit is designed to fit onto the Minitrains F&C chassis which I just happened to have a spare one of. I hadn't had the loco building mojo since Christmas but a week of annual leave at home and the impending end of the know world spurred me on to have a crack at the kit.

It follows the usual NP paradigm of a 3D printed carcass with etched overlays. This works really well and makes for a very simple build which ends up looking very good.

Replacement boiler furniture added and a pair of RT Models PQR couplings substituted for the supplied ones and I was pretty happy with the new look. I also added vacuum brake pipes.

Then I had a crisis of conscience about the dome I'd chosen. It was a nice N Brass brass casting but being for an n gauge loco it was slightly too small. A selection of replacements were tried.

Maybe...

A Varikit one?

A bit of a long shot.

Down to a short list of four.

What about adding a sand dome? No.

Anyway with a suitable casting chosen and glued on it was time to start the spoiling with paint phase. A coat of Halfords grey primer on the body and the red/brown on the frames. the plan being to give the loco a sort of L&B livery vibe, leaving the frames red/brown.

This is the state of play so far. I managed to break the clack valve for the other side so one is on order and nameplates are on their way from those lovely chaps at Narrow Planet. It will be called Wendy, named after an old friend who is having a very bad time at the moment.

I've also been working on a 3D print that I bought off evilbay. It isn't a bad print but is slightly too large to fit with my rolling stock. I thought the best thing to do was to finish it off and put it up for sale on said auction site. I've added a few fittings and nameplates etc and given it rather a nice paint job.
Designed to suit a KATO 103 chassis I found a very cut down version that I tried to fit into an Eggerbahn tram some years ago. Despite having a large amount of the body work missing it still works well and with the added weight in the body of the loco, it runs really rather well.


Here it is pulling quite a long train up the hill by Town Quarry.

The next thing to do to the NP kit is to let the paint harden off and then to add glazing to the window, some crew and lining. I might be a tiny bit distracted as I'm also in the process of building a small n gauge standard gauge layout...

Smallerfield, a preserved branch terminus in the SW of England.

Sunday, 8 March 2020

All quiet in the garage

I haven't done much actual modelling recently, but I have had a rummage in the stock boxes and tried out a few older things. This is the lighthouse resupply train with Sphinx the Kerr Stuart in the lighthouse siding.

The diesel bowser and ash v tip now have a length of jubilee track to sit on, made out of styrene strip.

The name plates arrived for Eva the Baldwin but still no one has bothered to give the loco a clean.

Arnold Lane Wharf and I spent three chilly days in the Slate Quarry Museum. Lots of families but really three days is two too many with this layout. All went ok though.

During the trying out phase I've had the NP 0-6-0 Bagnall out. It has never run properly and I think the problem is a quartering issue, I've improved it but it still isn't quite right.

People always wave at trains.